Clip Studio Paint is a versatile digital painting software that pairs well with Astropad Studio and provides an extensive collection of brushes and tools to its users. However, sometimes you may want to create your own brushes to meet your specific needs.
While you can easily edit the properties of any of the existing brushes provided by Clip Studio Paint, sometimes editing these settings may not be enough. Many artists create their own custom brushes and shapes that make painting foliage, hair, and other unique textures easier than ever!
How To Make A Custom Brush In Clip Studio Paint
If you are wanting to create a completely custom brush in Clip Studio Paint, you will first need to create an image in the shape of the brush tip you intend to use and set it as a material. You’ll then create a copy of an existing brush and overwrite it with the new material you’ve created.
Create a new folder in Materials
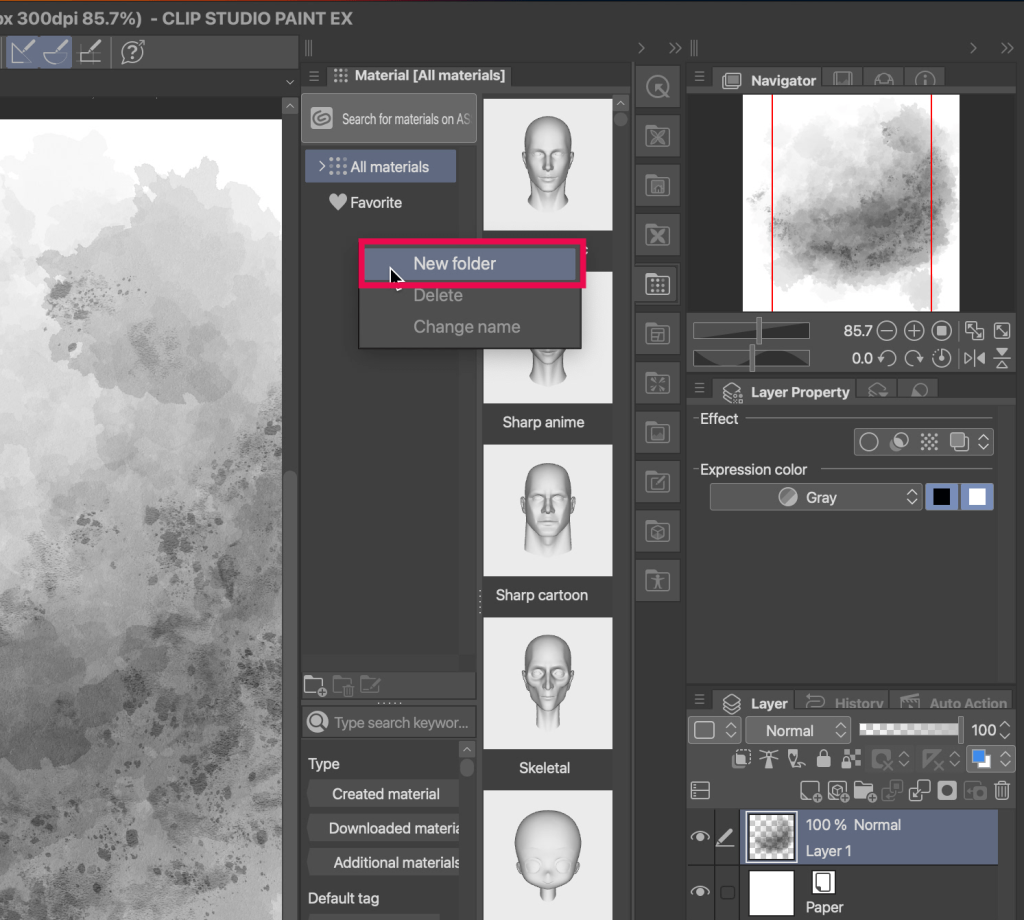
Before you get into the actual creation of your brush I recommend creating a new folder in Clip Studio Paint’s Materials tab so you have quick access to any of the brush materials you create.
- Click on one of the Material tabs.
- Right-click anywhere within the material tab and select New Folder.
- Name your folder. I named mine Brushes to keep it simple and easy to find.
Prepare your canvas
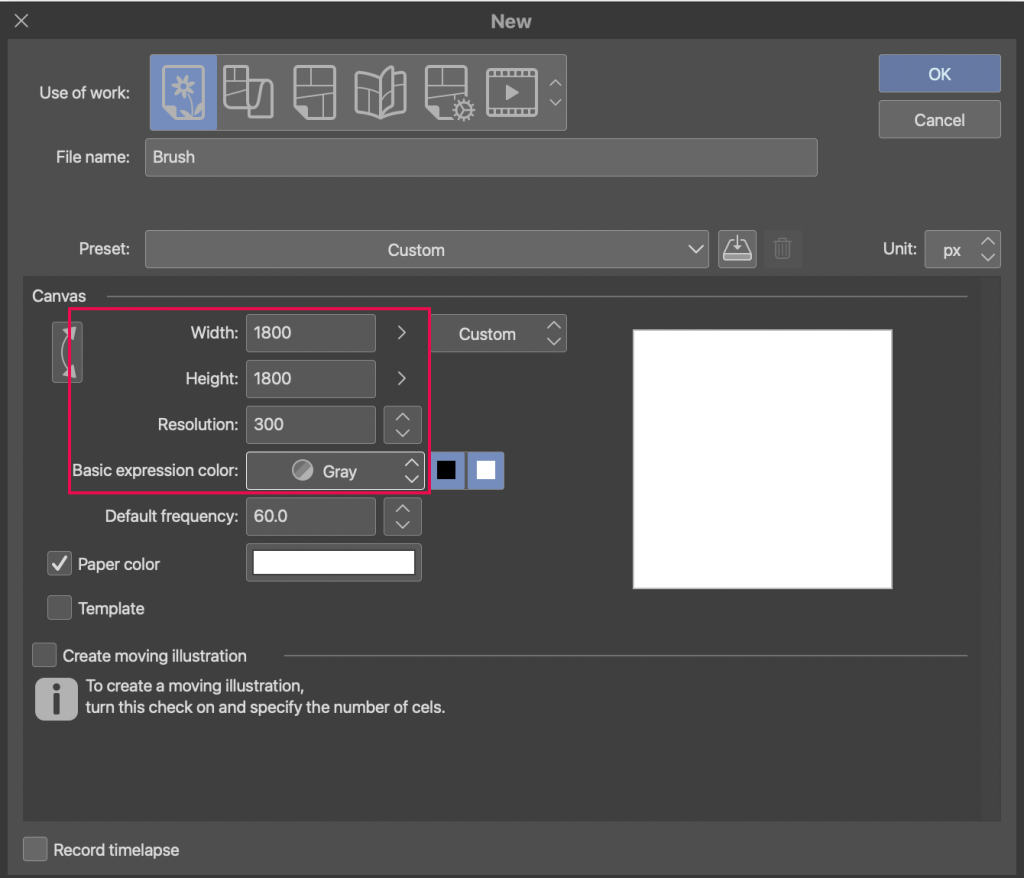
Now that you have a folder ready for the new material you will be creating, you will want to open a new project in Clip Studio Paint.
- Click on File, then click on New. This will open the settings window for a new canvas.
- On this window, adjust the size of your canvas. You will want a large canvas for this so I’d recommend a size within the thousands. For my brush I went with 2000×2000 and you will want to set yours to have 300dpi for resolution.
- Choose Gray for the Basic Expression Color. While you would not choose this for a normal painting, you want this for the brush so that you can use the brush for any color once it is created. The gray tones will simply represent the opacity of your brush. Darker grays will create a more saturated brush stroke. This is essential for creating your brush.
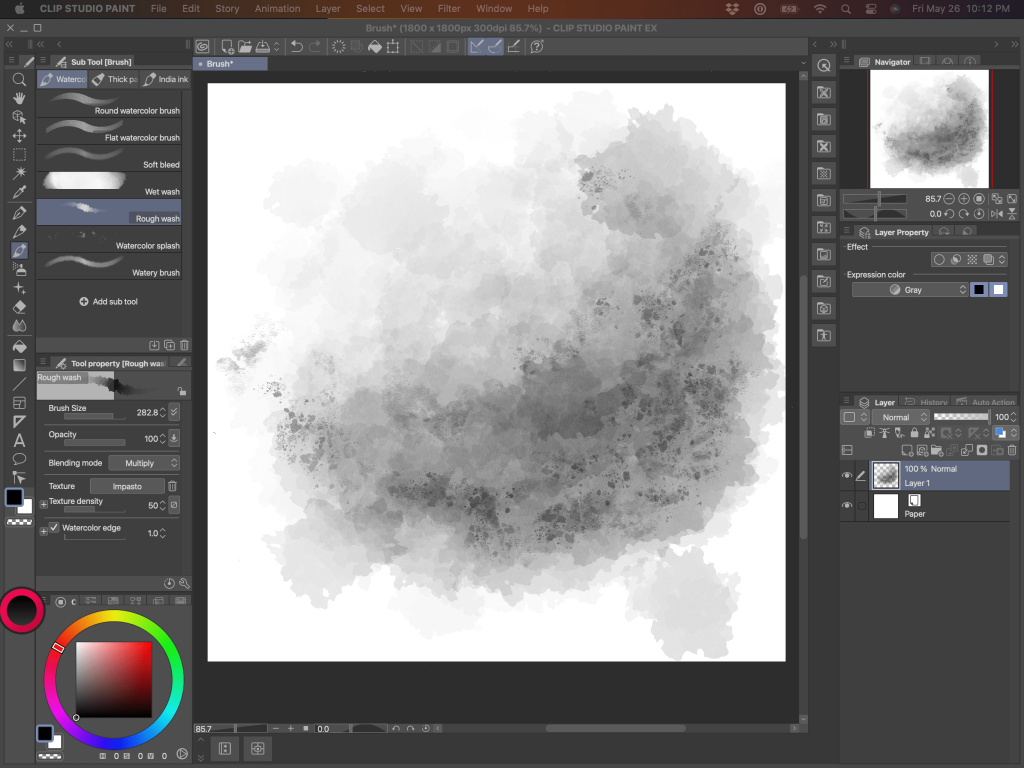
Create your brush tip
Now it is time to create your brush tip on the new canvas you’ve created. You will use the existing brushes in Clip Studio Paint to do so; think of this as a normal painting from here and draw whatever you wish to use as a brush tip.
There is not much guidance I can provide here since this will depend on your creativity And what you want out of your brush, but there are a few things to keep in mind:
- Light gray = Less saturated color
- Dark gray = More saturation
- Use most of the canvas if possible to ensure you don’t end up with a tiny brush!
- Use large shapes while creating your brush shape to ensure any texture does not get lost when using your brush at smaller sizes.
When your brush is complete, you will need to save it as a material. If you used multiple layers to create your brush, be sure to merge them together first! To merge your layers
- Select all layers relevant to your brush. Do not include the background layer to ensure only your brush is included.
- Right click on the selected layers.
- Click Merge Selected Layers.
Save your material
To save your brush, click Edit → Register Material → Image…
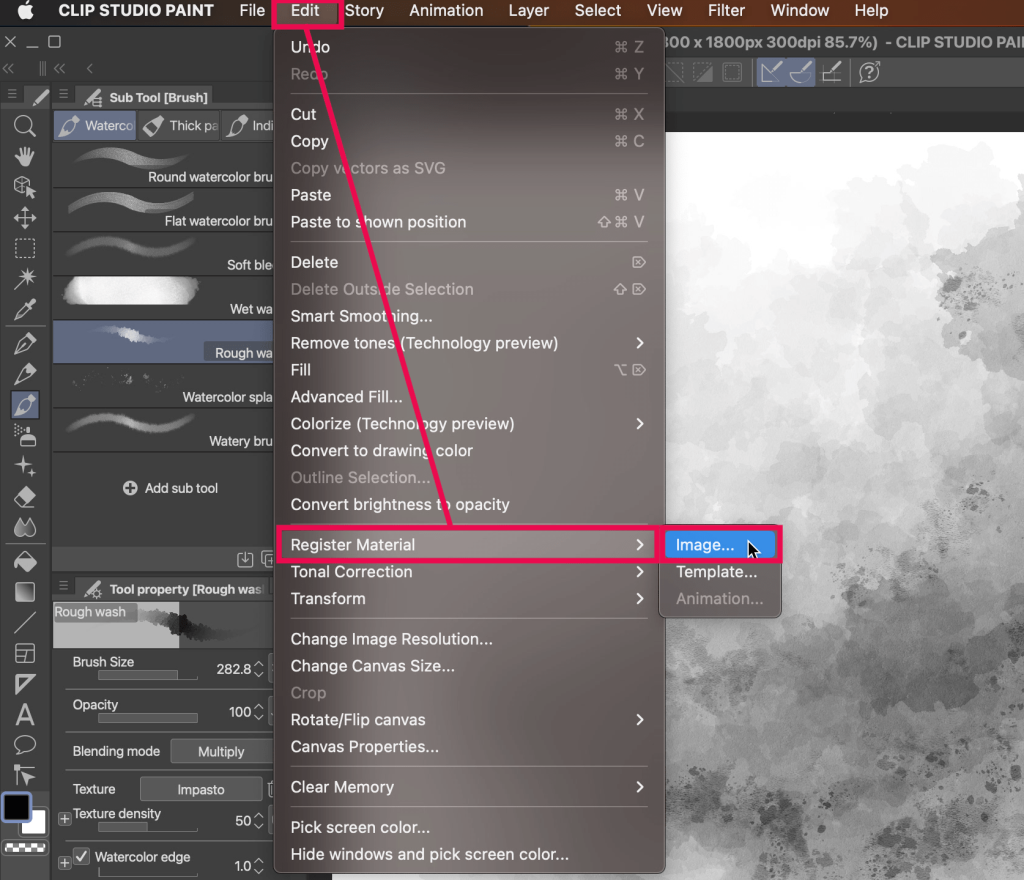
Once you click on Image… a settings window will appear with some options we will need to change.
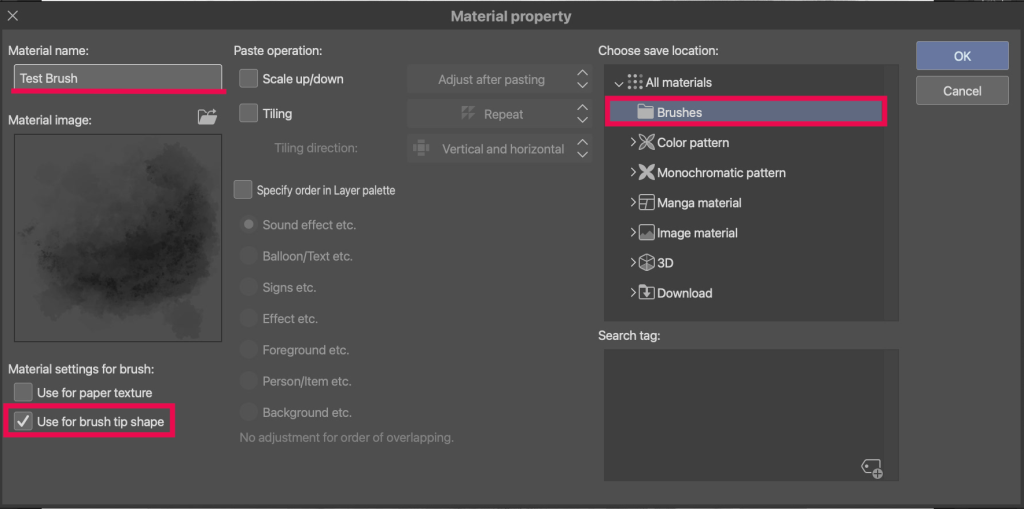
- Change the name of your brush Material to something recognizable.
- Underneath the preview window for your brush, select the option that says Use for Brush Tip Shape
- Select the folder you created at the beginning in Materials as the location to save your brush shape to.
Create your brush
Now that you have your material saved, it is time to assign it to a brush. For this, you will need to create a copy of an existing brush. To do so, right-click on a brush. It does not matter what brush you select for this since you will be replacing it. For my convenience, I used the Astropad Studio magic gesture to right-click. Next, click Duplicate Sub Tool on the menu that appears.

Next, a small settings window will appear for your duplicated brush tool. Be sure to name your duplicated brush something recognizable as this is what we will be applying that material we created to. Once your brush is named, you can click OK.
Once your custom brush tool is created:
- Select it and click on the Tool Property tab.
- Click on the wrench icon at the bottom of the Tool Property tab. This will open a new window.
- Click on Brush tip then on Material. This will open a material selection window.
- For ease of access, click on the Created material tab and select your brush material from the list.
- Click OK to assign this material to your brush.
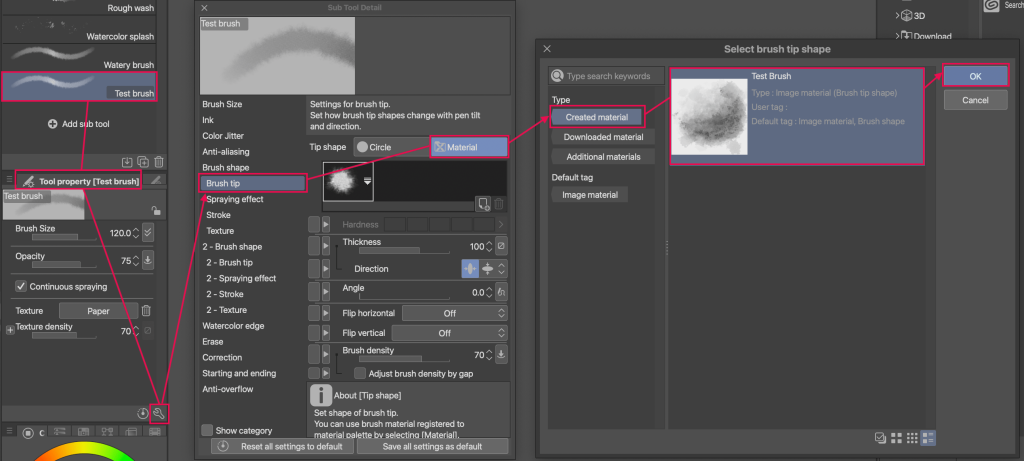
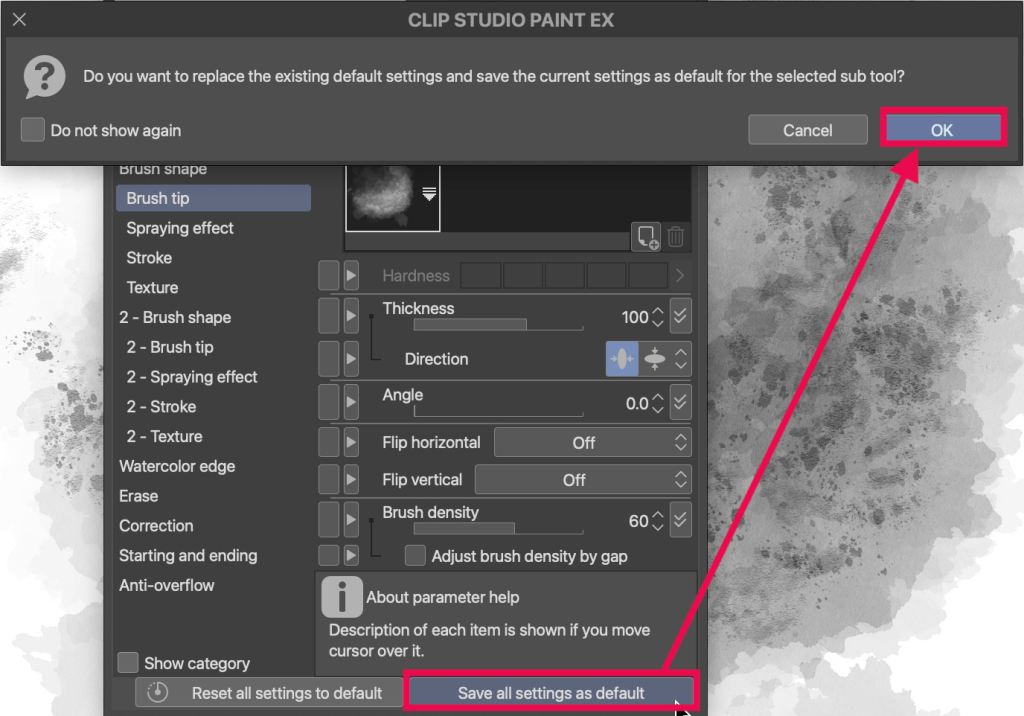
Be sure to make any adjustments you’d like in the brush settings window and then click Save all settings as default.
Now you are ready to use your brush in your next project! We recommend trying out your new Clip Studio Paint brush with Astropad Studio. Not only can you customize your brush use even further through adjustable pressure curves, but you can also use touch gestures to streamline your workflow!
Get started today with Clip Studio Paint on your iPad
Get the most out of CSP with your iPad! Try out Astropad Studio with our free 14-day trial. No commitments, cancel any time.

- Mirror any desktop app on your iPad
- Compatible with Mac and PC
- Build your own shortcut panel, custom gestures, and custom quick keys
- Utilize pressure-sensitive and precise sculpting and painting
- Connects over WiFi or USB cable